Leverage the incident information you enter in Incident with dynamic and easy to use reports. The reports are used to quickly see trends in the allocation of your resources. You can see what type of work is being requested, where the work is being done, employee productivity, etc. There are dozens of PDF and Excel reports available, all with customizable filter options.
Most of the items listed in the Information Analysis section of the home page are reportable fields in Incident.
How to Run Reports
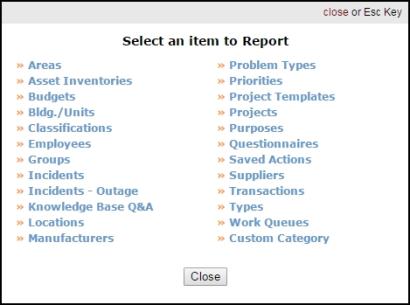
- To access the report criteria screens, click on the Report link in the Actions menu.

- Then click on the appropriate link for the report you would like to run.

- This brings you to a report criteria page where you can select the information you want to include in your report.
You can also run reports by clicking on any link in the Information Analysis section of the home page. Hover your mouse over the Shortcuts menu and click the Report link to access the report criteria selection page.
- The first few steps are very important to ensure you get the correct results in your report.
- Select your Reporting Period. You can select a predefined period from the drop down box (Last Week, This Month, Fiscal Year, etc.) or you can type your own date range into the Custom Begin and Custom End fields.
- Select the Type of Reporting Date. This selection will affect how the system views your date range entered previously. For example, if you select Request Date, the system will look for incidents requested within the date range selected. But if you choose Completion Date, the system will only report on incidents completed within the date range, regardless of when it was requested.
- Continue to enter the filtering criteria for your report. The more information you select, the more narrow and specific your returned results will be.
- If you need to highlight more than one item in a selection box, click on your first item, then hold down your Ctrl key when selecting the others.
- At the bottom of each report screen, you will be asked to choose the Report Type for Viewing. This usually includes a Summary Report and a Detail Report. (There may be other options on some reports.) Each report type includes varying degrees of detail and different formatting. Try each one until you find the one that includes the information you want.
- Then you will choose a Report Format, usually PDF or Excel Spreadsheet.
- Click Print This at the bottom of the page to view a print preview of your report. You can then send it to your printer.
- If the report you are running has an option to save at the bottom, it means this report can be used as a Saved Action. You can enter a Report Title and click Save to make it available on the Saved Action screen.
Two of the more commonly used reports are the Incident report and the Transaction report.
The Incident Summary 2 Report is a great report to run. Almost any information you are looking for can be found in this report. It gives a nice breakdown of each incident that meets your report criteria: the status, the current "assign to", the requester, the days aged, labor hours, and total costs accrued. Depending on how you sort your results, you will get a total for each "grouping" and then a grand total for all the incidents combined.
The Transaction Detail Report is another great report in Incident. This report gives a breakdown of transactions entered on incidents for a specified reporting period and includes information such as the incident description, transaction description, quantity and unit cost of labor and/or materials.
